
This article introduces visual testing as a technique that can revolutionize software quality assurance (QA) practices. It is based on a talk I delivered on June 9, 2022 at AITP-RTP, and its target audience includes IT professionals and leaders who may not be hands-on with testing, coding, or automation.
Visual testing techniques are an incredible way to maximize the value of your functional tests. Instead of checking traditional things like text or attributes, visual testing captures full snapshots of your application’s pages and looks for visual differences over time. This isn’t just another nice-to-have feature that’s on the bleeding edge of technology. It’s a tried-and-true technique that anyone can use, and it makes testing easier!
In this article, I want to “open your eyes” to see how visual testing can revolutionize how you approach software quality. I want you to see things in new ways, and I’ll cover five key advantages of visual testing. I’ll use Applitools as the visual testing tool for demonstration. And don’t worry, everything will be high-level – I’ll be light on the code.
What is software testing?
We all know that there are several different kinds of testing. Here’s a short list:
- Unit
- Integration
- End-to-End
- Web UI
- REST API
- Mobile
- Load testing
- Performance testing
- Property-based testing
- Behavior-driven
- Data-driven
You name it, there’s a test for it. We could play buzzword bingo if we wanted. But what is “testing”? In simplest terms, testing = interaction + verification. That’s it! You do something, and you make sure it works. Every kind of testing reduces to this formula.
We’ve been testing software since the dawn of computers. The “first computer bug” happened on September 9, 1947, when a moth flew into one of the relays of the Mark II computer at Harvard University. What you’re seeing here is Grace Hopper’s bug report, with the dead moth taped onto the notebook page.
Traditional testing practices
Historically, all testing was done manually. Whether it was Grace Hopper pulling a dead moth out of computer relays with tweezers or someone banging on a keyboard to navigate through a desktop app, humans have driven testing. Manual testing was practically the only way to do testing for decades. As applications became more user-centric with the rise of PCs in the 1980s, testing became a much more approachable discipline. Folks didn’t need to hold computer science degrees or to be software engineers to be successful – they just needed common sense and grit. Companies built entire organizations for testers. Releases wouldn’t ship until QA gave them seals of approval. Test repositories could have hundreds, even thousands, of test procedures.
Unfortunately, manual testing does not scale very well. It’s a slow process. If you want to test an app, you need to set everything up, log in, and exercise all the different features. Any time you discover a problem, you need to stop, investigate, and write a report. Every time there’s a new development build, you need to do it all over again. The only way to scale is to hire more testers. Even with more people, testing cycles could take days, weeks, or even months. When I worked at NetApp, the main functional testing phase for a major release took over half a year to complete.

The rise of automation
Then, automation came. It started becoming popular with unit testing for functions and methods directly in the code itself in the late 1990s, but then black box automation tools and frameworks started becoming popular in the mid 2000s. Instead of manually performing test cases step by step, testers would write scripts to automatically execute test steps.
Tools like Selenium made it possible to automate browser interactions for testing web apps. Folks could code Selenium calls using the programming language of their choice: Java, JavaScript, C#, Python, Ruby, or PHP. Later, frameworks like Cypress and Playwright refined the experience that Selenium started. Other tools like SoapUI and (later) Postman made it easy to peel back frontend layers and test APIs directly. Appium made it possible to automate tests for mobile apps. So many solutions hit the market. The ones here are only a few. (Please don’t hate me if I didn’t mention your favorite tool here!) Many were free and open source, while others were licensed software products.
Automation offered several benefits over manual testing. With automation, you could run tests more quickly. Scripts don’t need to wait for humans to react to pages or write down results. You could also run tests more frequently. Teams started running tests continuously – nightly at first, and then after every code change. These benefits enabled teams to widen their test coverage and provide faster feedback. Testing work that would take a full team days to complete could be finished in a matter of hours, if not minutes. Test results would be posted in real time instead of at the end of testing cycles. Instead of endlessly executing tests manually, testers gained time back to work on other things, like automating even more tests or doing exploratory testing activities.

Challenges with automation
Unfortunately, it wasn’t all rainbows and unicorns. Test automation was hard to develop. Since it was inherently more complex than manual testing, it required more skills. Testers needed to learn how to use tools like Selenium or Postman. On top of that, they needed to learn how to do programming. If they wanted to use codeless tools instead, then their companies probably had to shell out a pretty penny for licenses. Regardless of the tools chosen, automated scripts could never be made perfect. They are inherently fragile because they depend directly upon the features under test. For example, if a button on a web page changes, then the script will crash. Automated tests also gained a reputation for being flaky when testers didn’t appropriately handle waiting for things on the page to load. Furthermore, automation was only suitable for checking low-level things like text and numbers. That’s fine for unit tests and API tests, but it’s not suitable for user interfaces that are inherently visual. Passing tests could miss a lot of problems, giving a false sense of security.
When considering all these challenges together, we discovered as an industry that test automation isn’t fully autonomous. Despite dreaming of testing-made-easy, automation just made things harder. Teams who could build good test automation projects reaped handsome returns, but for many, the bar was too high. It was out of reach. Many tried and failed. Trust me, I’ve talked with lots of folks who struggle with test automation.
What we really want is the best of both worlds. We want the simplicity and sensibility of manual testing, but with the speed and scalability of automated testing. To get both, most teams use a split testing strategy. They automate some tests while running others manually. Actually, I’ve commonly seen teams run all their tests manually and then automate whatever they can with the time they have left. Some teams are more forward with their automation work, but not all. Folks perpetually make tradeoffs.
But, what if there was a way to get the simplicity and sensibility of manual testing with automation? What if automation could visually inspect our applications for differences like a human could?
Walking through an example
Consider a basic web application with a standard login page:
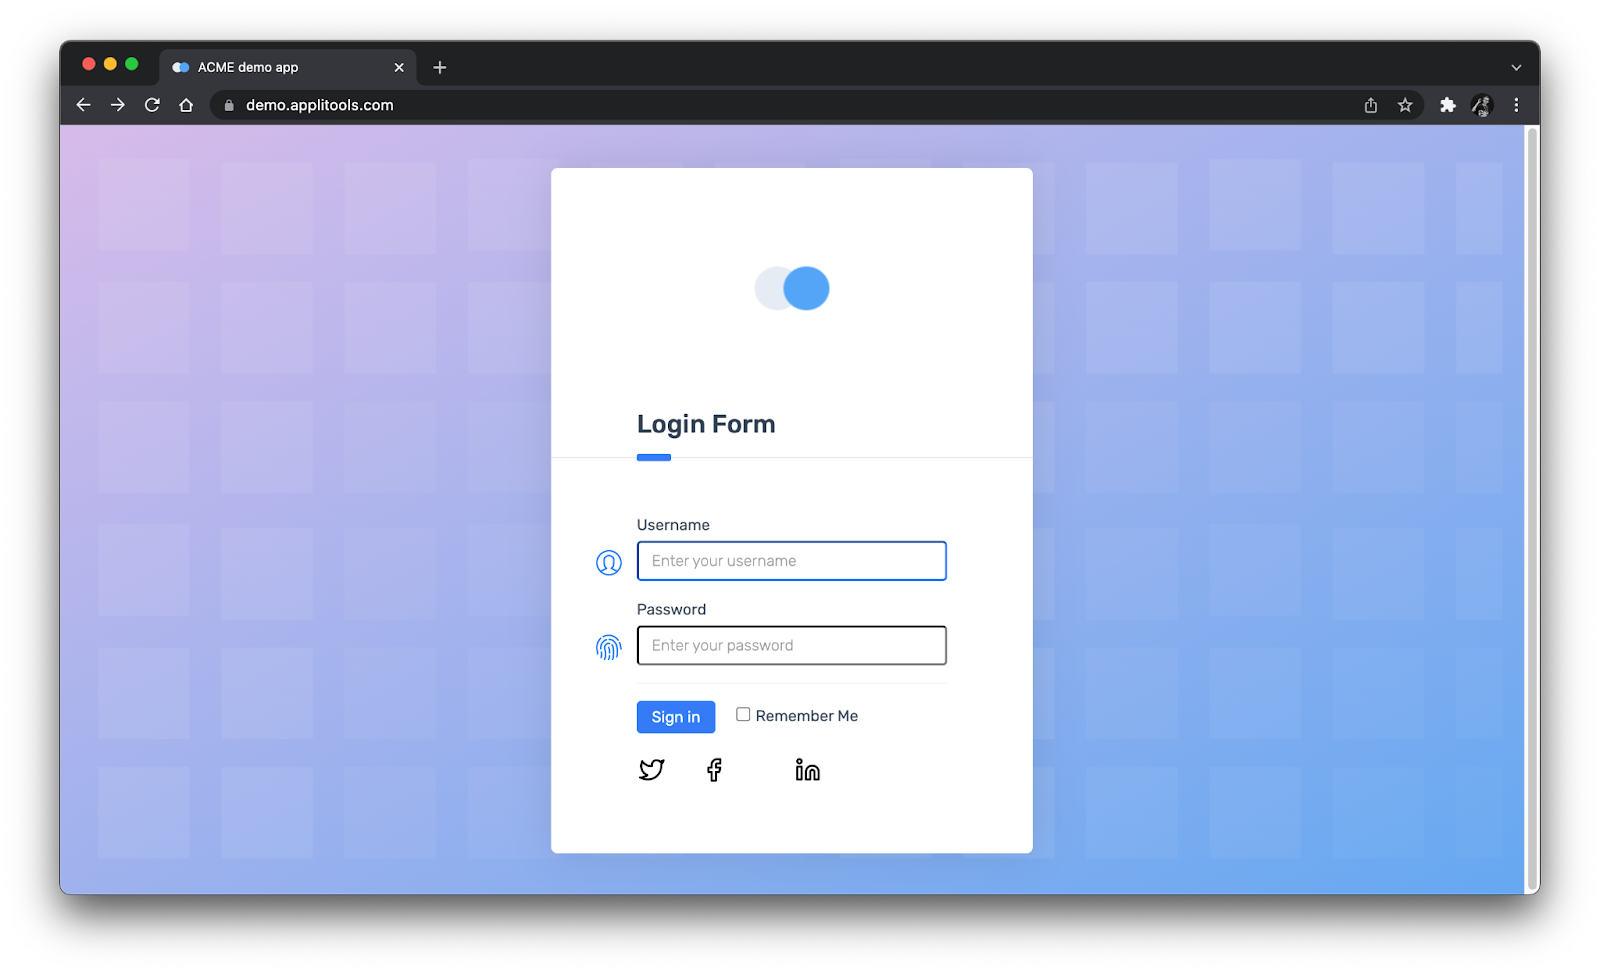
When we look at this from top to bottom, we see:
- A logo
- A page title
- A username field
- A password field
- A sign-in button
- A remember-me checkbox
- Links to social media
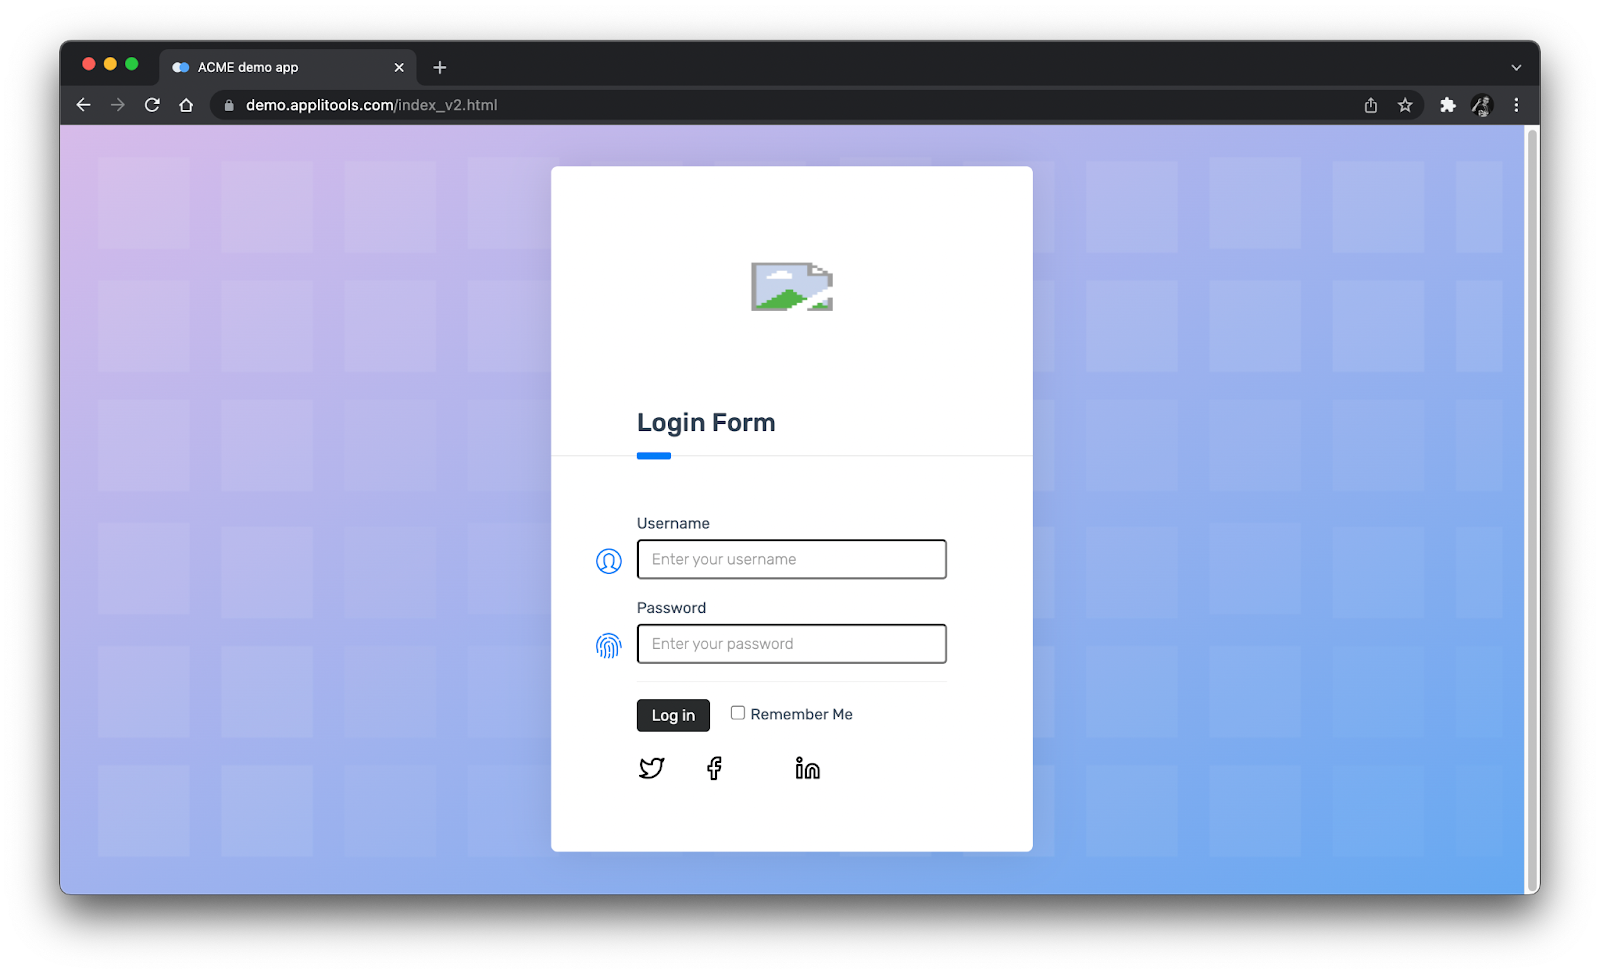
However, during the course of development, we know things change – for better or worse. Here’s a different version of the same page:
Can you spot the differences? Looking at these two pages side-by-side makes comparison easier:
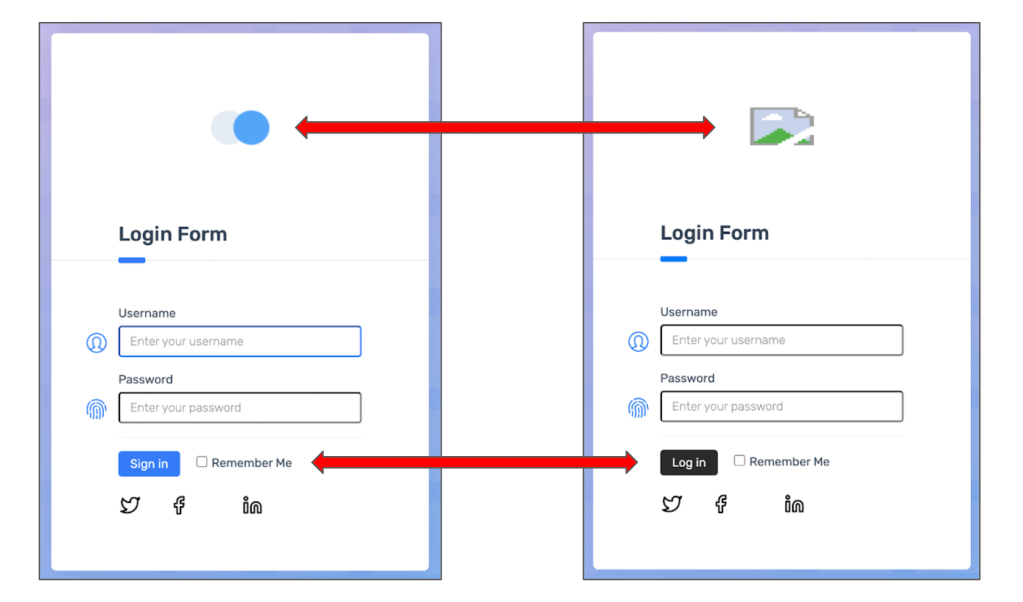
The logos are different, and the sign-in buttons are different. While I’d probably ask the developers about the sign-in button change, I’d categorically consider that logo change a bug. My gut tells me a human tester would catch these differences if they were paying attention, but there’s a chance they could miss them. Traditional automation would most likely fly right by these changes without stopping.
In fact, pages can be radically broken visually yet still have passing automated tests. In this version, I stripped all the CSS off the page:
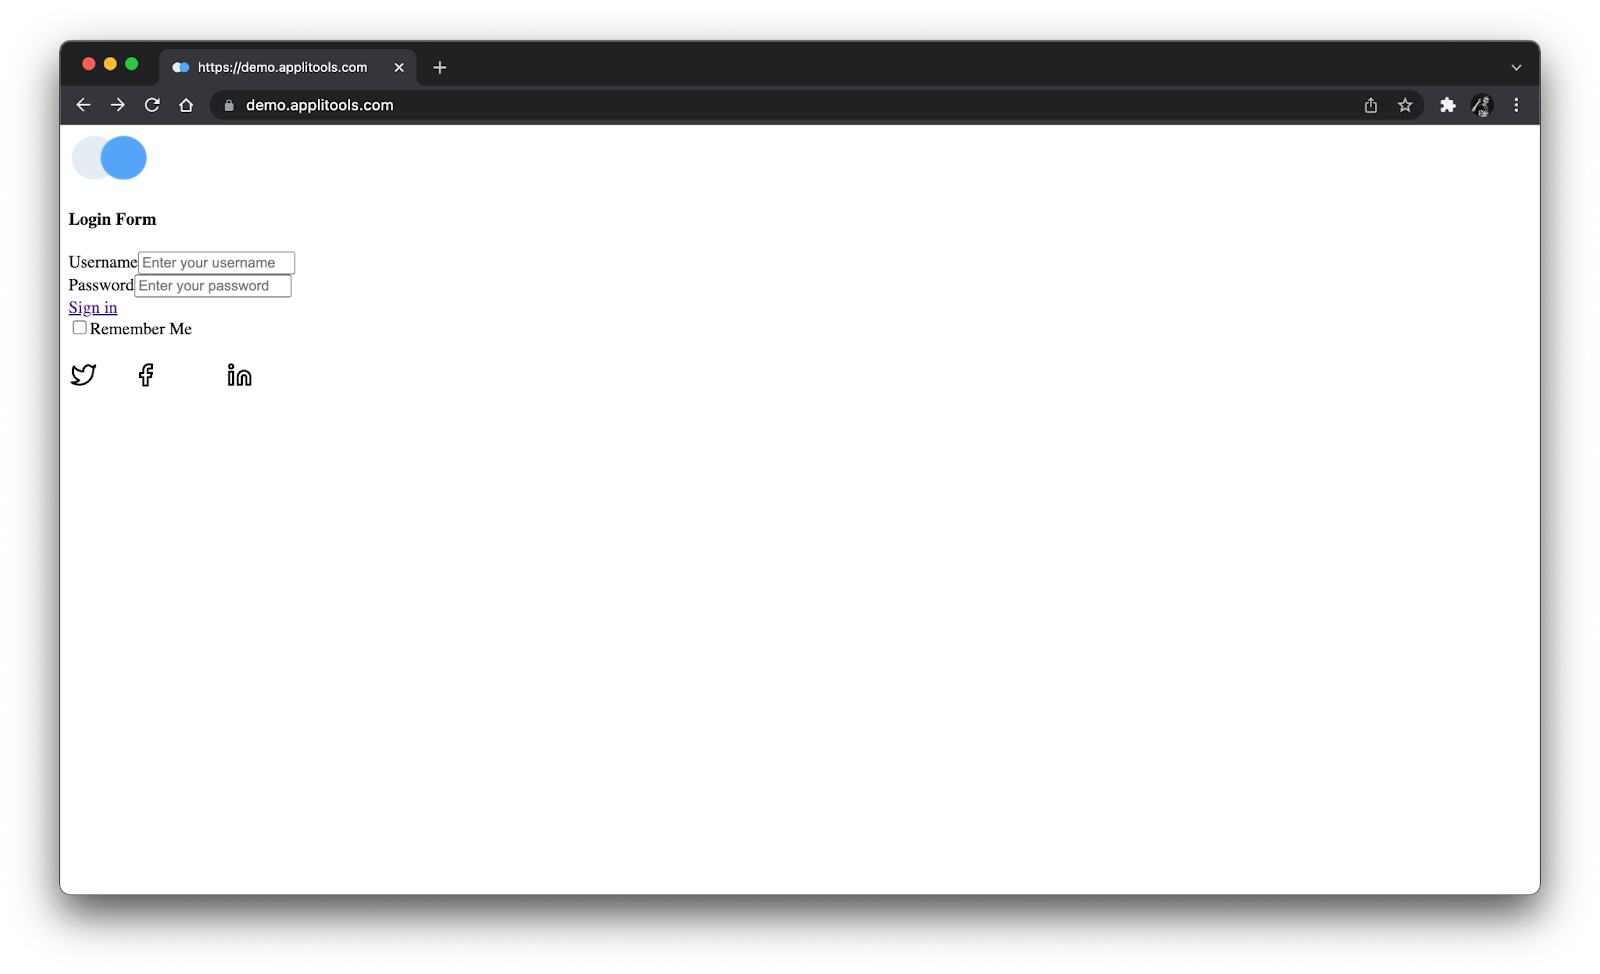
We would definitely call this page broken. A traditional functional test script hinges on the most basic functionality of web pages, like IDs and element attributes. If it clicks, it works! It completely misses visuals. I even wrote a short test script with basic assertions, and sure enough, it passed on all three versions of this login page. Those are huge test gaps.
The magic of visual testing
So, what if we could visually inspect this page with automation? That would easily catch any changes that human eyes would detect, but with speed and scale. We could take a baseline snapshot that we consider “good,” and every time we run our tests, we take a new “checkpoint” snapshot. Then, we can compare the two side-by-side to detect any changes. This is what we call visual testing: take a baseline snapshot to start, take a checkpoint snapshot after every change, and look for any visual differences programmatically. If a picture is worth a thousand words, then a snapshot is worth a thousand assertions.

One visual snapshot captures everything on the page. As a tester, you don’t need to explicitly state what to check: a snapshot implicitly covers layout, color, size, shape, and styling. That’s a huge advantage over traditional functional test automation.
Visual Testing Advantage #1:
Visual testing covers everything on a page.
Unfortunately, not all visual testing techniques are created equal. Programming a tool to capture snapshots and perform pixel-by-pixel comparisons isn’t too difficult, but determining if those changes matter is very difficult. A good visual testing tool should ignore changes that don’t matter – like small padding differences – and focus on changes that do matter – like missing elements. Otherwise, human testers will need to review every single result, nullifying any benefit of automating visual tests.
Take a look at these two pictures. They show a cute underwater scene. There are a total of ten differences between the two pictures. Can you find them?

Unfortunately, a pixel-to-pixel comparison won’t find any of them. I ran these two pictures through Applitools Eyes using an exact pixel-to-pixel comparison, and this is what happened:

Except for the whitespace on the sides, every pixel was different. As humans, we can clearly see that these images are very similar, but because they were a few pixels off on the sides, automation failed to pinpoint meaningful differences.
This is where AI really helps. Applitools uses Visual AI to detect meaningful changes that humans would see and ignore inconsequential differences that just make noise. Here, I used Applitools’ “strict” comparison, which pinpointed each of the ten differences:
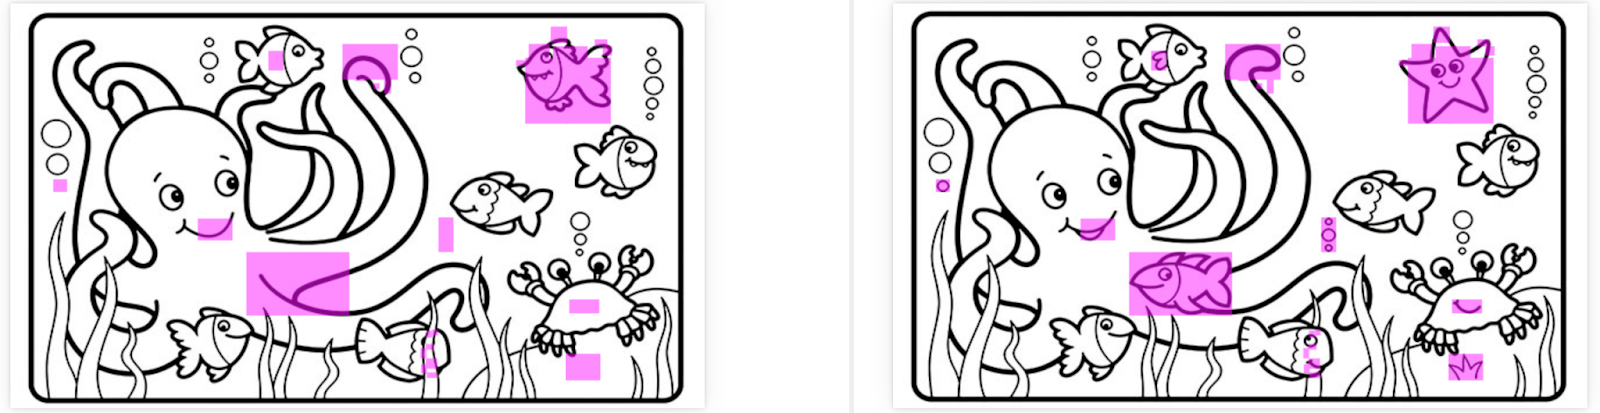
That’s the second advantage of good automated visual testing: Visual AI focuses on meaningful changes to avoid noise. Visual test results shouldn’t waste testers’ time over small pixel shifts or things a human wouldn’t even notice. They should highlight what matters, like missing elements, different colors, or skewed layouts. Visual AI is a differentiator for visual testing tools. Not all tools rise above pixel-to-pixel comparisons.
Visual Testing Advantage #2:
Visual AI focuses on meaningful changes to avoid noise.
Simplifying test cases
Now, there are two main ways to automate tests. One path is to use coded tools. Tools like Selenium WebDriver are “coded” tools because they require testers to call them directly from programming code. Selenium WebDriver has bindings in Java, JavaScript, C#, Python, or Ruby, so testers can pick the language of their choice. Nevertheless, testers must essentially be developers to use coded tools.
The second path to automation is using codeless tools. Codeless tools don’t require testers to have programming skills. Instead, they record testers as they exercise features under test, and then they can replay those recorded tests at the push of a button. Most codeless tools also have some sort of visual builder through which testers can tweak and update their tests. There are several codeless tools available on the market, and many of them require paid licenses. However, Selenium IDE is a free and open source tool that does the job quite nicely.
Coded and codeless tools serve different needs. Coded tools are great for folks like me who know how to code and want high-power, customizable automation. Codeless tools are great for teams that are just getting started with automation, especially when most of their testing has historically been done manually. Regardless of approach, the good news is that you can do visual testing either way! For example, if you use Applitools, then there are SDKs and integrations for many different tools and frameworks.
As we recall, testing is interaction plus verification. When automating tests, the interactions and the verifications are scripted using either a coded or codeless tool. Testers must specify each of those operations. For example, if a test is exercising login behavior on this login page:
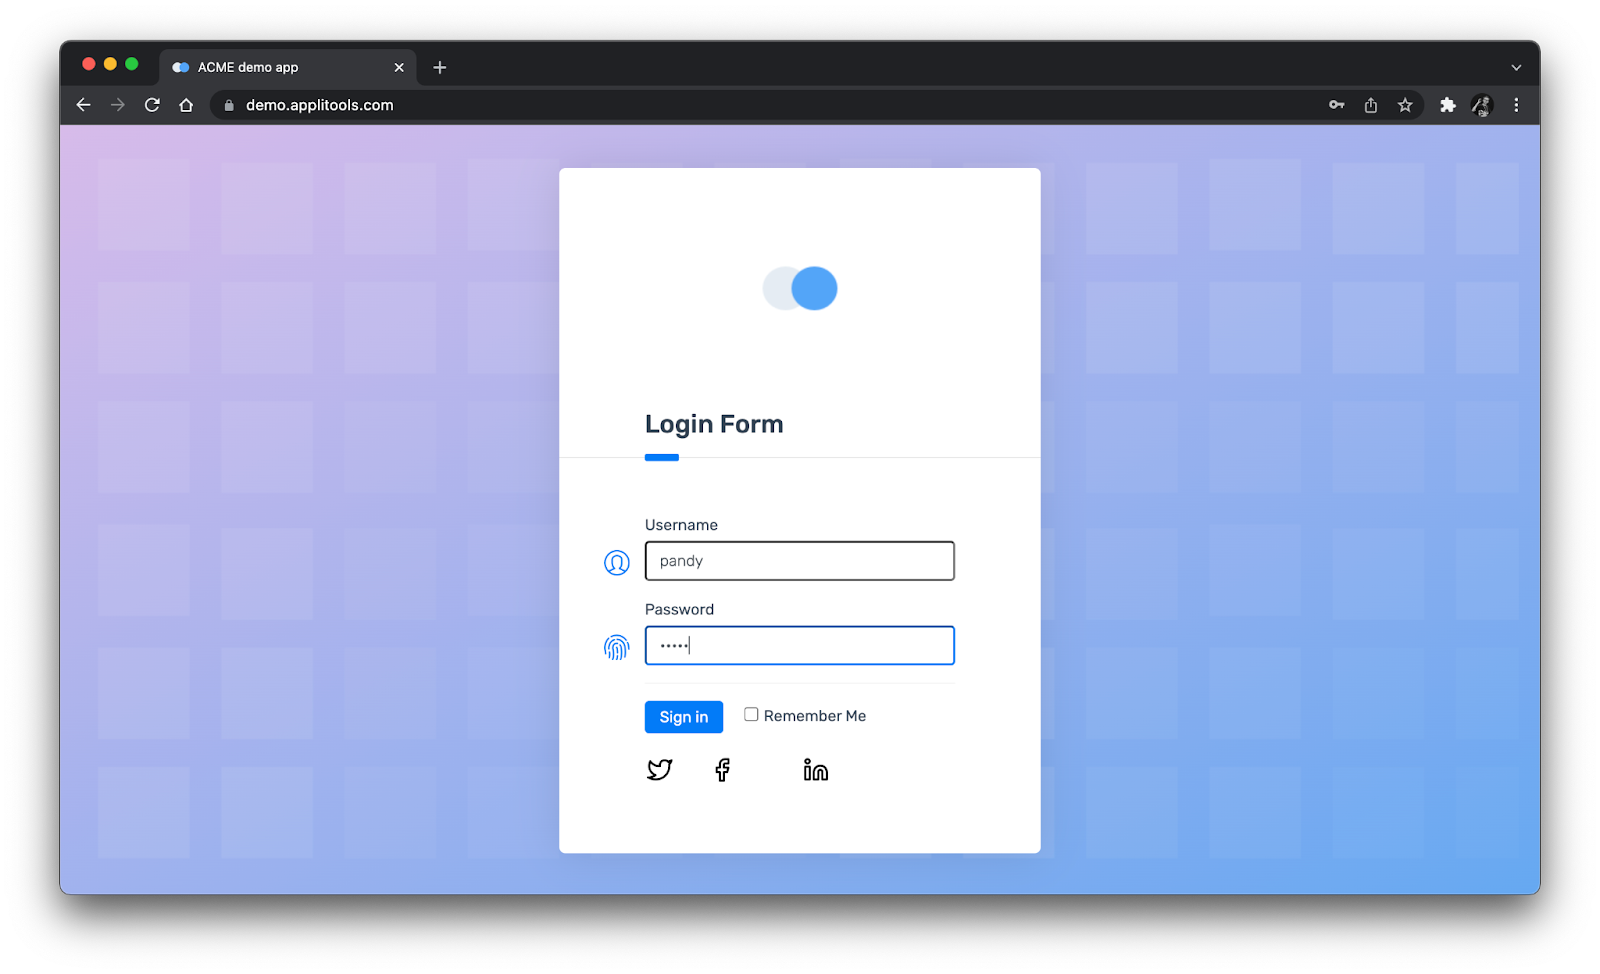
Then the interactions would be:
- Loading the page
- Entering username
- Entering password
- Clicking the login button
- Waiting for the main page to load
And then, the verifications would be checking that the main page loads correctly:
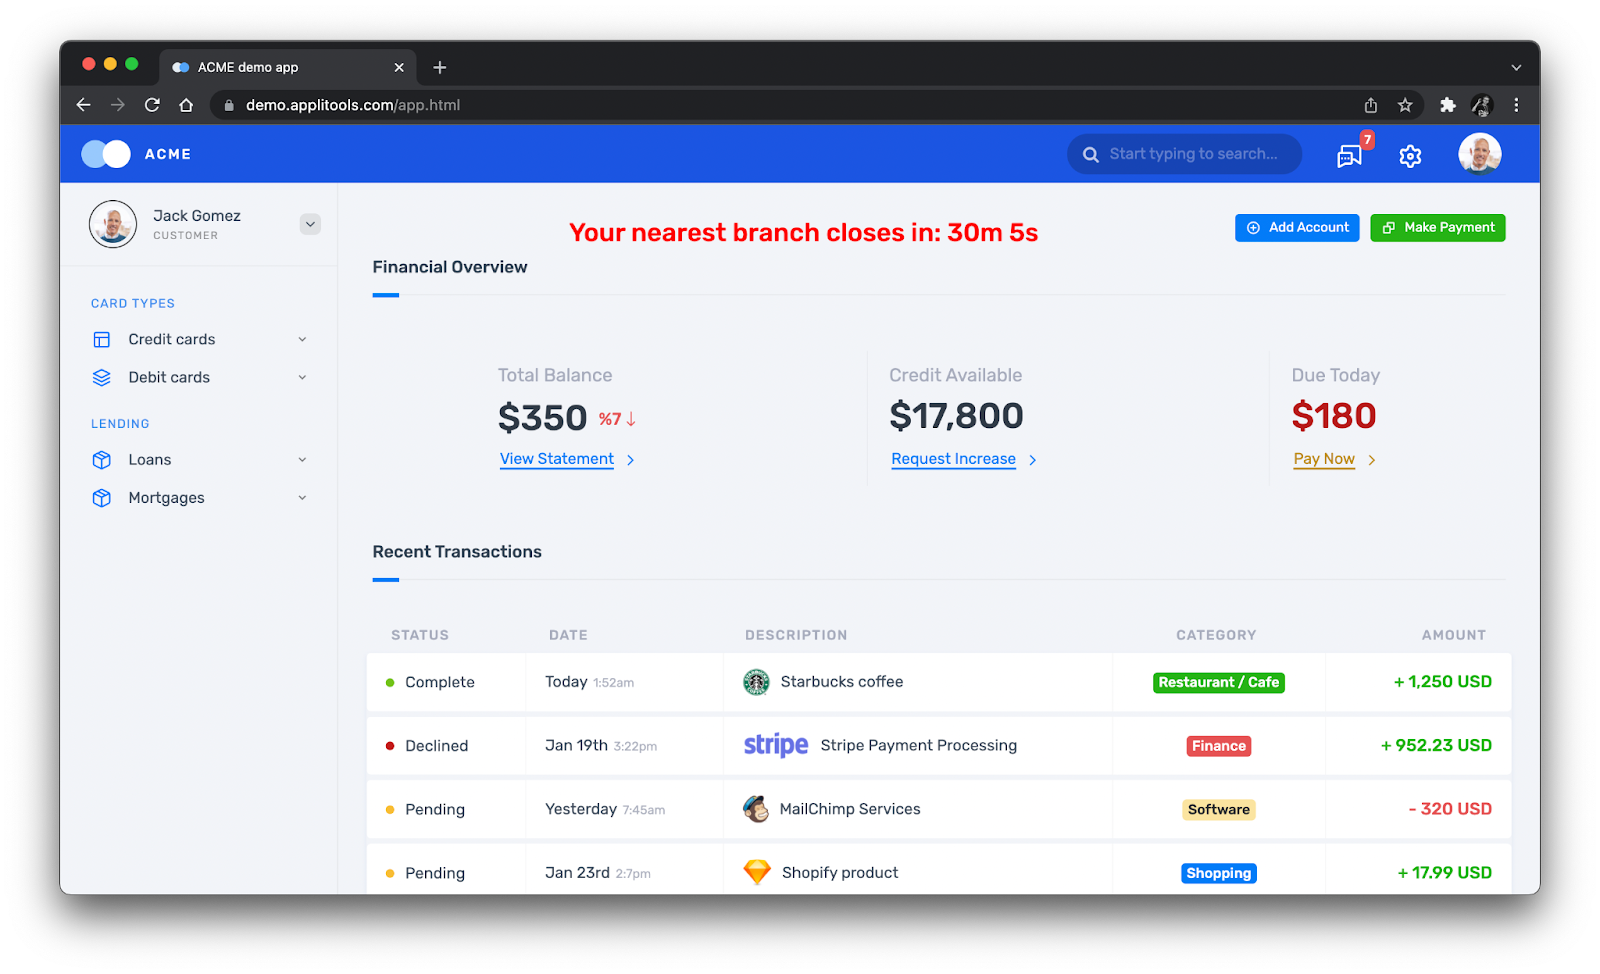
As we can see, this main page has lots of stuff on it. We could check several things:
- The title bar at the top
- The side bar with different card types and lending options
- The warning message about nearby branches closing soon
- The values in the financial overview
- The table of recent transactions
But, what should we check? The more things we verify in a test, the more coverage the test will have. However, the test will take longer to develop, require more time to run, and have a higher risk of breaking as development proceeds.
I wrote some Java code to perform high-level assertions on this page:
// Check various page elements
waitForAppearance(By.cssSelector("div.logo-w"));
waitForAppearance(By.cssSelector("div.element-search.autosuggest-search-activator > input"));
waitForAppearance(By.cssSelector("div.avatar-w img"));
waitForAppearance(By.cssSelector("ul.main-menu"));
waitForAppearance(By.xpath("//a/span[.='Add Account']"));
waitForAppearance(By.xpath("//a/span[.='Make Payment']"));
waitForAppearance(By.xpath("//a/span[.='View Statement']"));
waitForAppearance(By.xpath("//a/span[.='Request Increase']"));
waitForAppearance(By.xpath("//a/span[.='Pay Now']"));

// Check time message
assertTrue(Pattern.matches(
        "Your nearest branch closes in:( \\d+[hms])+",
        driver.findElement(By.id("time")).getText()));

// Check menu element names
var menuElements = driver.findElements(By.cssSelector("ul.main-menu li span"));
var menuItems = menuElements.stream().map(i -> i.getText().toLowerCase()).toList();
var expected = Arrays.asList("card types", "credit cards", "debit cards", "lending", "loans", "mortgages");
assertEquals(expected, menuItems);

// Check transaction statuses
var statusElements = driver.findElements(By.xpath("//td[./span[contains(@class, 'status-pill')]]/span[2]"));
var statusNames = statusElements.stream().map(n -> n.getText().toLowerCase()).toList();
var acceptableNames = Arrays.asList("complete", "pending", "declined");
assertTrue(acceptableNames.containsAll(statusNames));
If you don’t know Java, please don’t be frightened by this code! It checks that certain elements and links appear, that the warning message displays a timeframe, and that correct names for menu items and transaction statuses appear. As you can see, that’s a lot of complicated code – and that’s what I want you to see.
Sadly, its coverage is quite shallow. This code doesn’t check the placement of any elements. It doesn’t check the title bar, the financial overview values, or any transaction values other than status. If I wanted to cover all these things, I’d probably need to add at least another hundred lines of code. That might take me an hour to find all the locators, parse the text values, and run it a few times to make sure it works. Someone else would need to do a code review before the changes could be merged, as well.
If I do visual testing, then I could eliminate all this code with a one-line snapshot call:
eyes.check(Target.window().fully().withName("Main page"));
One. Line.
As an engineer, I cannot overstate how much this simplifies test development. A single snapshot implicitly covers everything on the page: visuals, text, placement, and color. I don’t need to make tradeoffs about what to check and what not to check. Visual snapshots remove a tremendous cognitive burden. They improve test coverage and make tests more robust. This is the same whether you are using a coded tool like Selenium WebDriver in Java or a codeless tool like Selenium IDE.
This is the third major advantage visual testing has over traditional functional testing: visual snapshots greatly simplify assertions. Instead of spending hours deciding what to check, figuring out locators, and writing transformation logic, you can make one concise snapshot call and be done. I said it before, and I’ll say it again: If a picture is worth a thousand words, then a snapshot is worth a thousand assertions.
Visual Testing Advantage #3:
A snapshot is worth a thousand assertions.
Testing different browsers and devices
So, what about cross-browser and cross-device testing? It’s great if my app works on my machine, but it also needs to work on everyone else’s machine. The major browsers these days are Chrome, Edge, Firefox, and Safari. The two main mobile platforms are iOS and Android. That might not sound like too much hassle at first, but then consider:
- All the versions of each browser – typically, you want to verify that your app works on the last two or three releases.
- All the screen sizes – modern web apps have responsive designs that change based on viewport.
- All the device types – desktops and laptops have various operating systems, and phones and tablets come in a plethora of models.
We have a combinatorial explosion! Traditional functional tests must be run start-to-finish in their entirety on each of these platforms. Most teams will pick a few of the most popular combinations to test and skip the rest, but that could still require lots of test execution.
Visual testing simplifies things here, too. We already know that visual testing captures snapshots of pages in our applications to look for differences over time. Note how I used the word “snapshot” and not “screenshot.” That was deliberate. A screenshot is merely a rasterized capture of pixels reflecting an instantaneous view. It’s frozen in time and in size. A snapshot, however, captures everything that makes up the page: the HTML structure, the CSS styling, and the JavaScript code that brings it to life.

Snapshots are more powerful than screenshots because snapshots can be re-rendered. For example, I could run my test one time on my local machine using Google Chrome, and then I could re-render any snapshots I capture from that test on Firefox, Safari, or Edge. I wouldn’t need to run the test from start to finish three more times – I just need to re-render the snapshots in the new browsers and run the Visual AI checker. I could re-render them using different versions and screen sizes, too, because I have the full page, not just a flat screenshot. This works for web apps as well as mobile apps.
Visually-based cross-platform testing is lightning fast. A typical UI test case takes about a minute to run. It could be more or less, but from my experience, 1 minute is a rough industry average. A visual checkpoint backed by Visual AI takes only a few seconds to complete. Do the math: if you have a large test suite with hundreds to thousands of tests that you need to test across multiple configurations, then visual testing could save you hours, if not days, of test execution time per cycle. Plus, if you use a service like Applitools Ultrafast Test Cloud, then you won’t need to set up all those different configurations yourself. You’ll spend less time and money on your full test efforts.
Visual Testing Advantage #4:
Visual snapshots enable lightning-fast cross-platform testing.
When to start visual testing
There is one more thing I want y’all to consider: when should a team adopt visual testing into their quality strategy? I can’t tell you how many times folks have told me, “Andy, that visual testing thing looks so cool and so helpful, but I don’t think my team will ever get there. We’re just getting started, and we’re new to automation, and automation is so hard, and I don’t think we’ll ever be mature enough to adopt visual testing techniques.” Every time I hear these reasons, I can’t help but do a facepalm.
Visual testing makes automation easier:
- It makes verifications much easier to perform.
- Visual snapshots cover more of a view than traditional assertions ever could.
- Visual AI ensures that any visual differences identified are important.
- Re-rendering snapshots on different configurations simplifies cross-platform testing.
I really think teams should do visual testing from the start. Consider this strategy: start by automating a few basic tests that navigate to different pages of an app and capture snapshots of each. The interactions would be straightforward, and the verifications would be single-step one-liners. If the testers are new to automation, they could go codeless with Selenium IDE just to get started. That would provide an immense amount of value for relatively little automation work. It’s the 80/20 rule: 80% of the value for 20% of the work. Then, later, when the team has more time or more maturity, they can expand the automation project with larger tests that use both traditional and visual assertions.
Visual Testing Advantage #5:
Visual testing makes functional testing easier.
Test automation is hard, no matter what tool or what language you use. Teams struggle to automate tests in time and to keep them running. Visual testing simplifies implementation and execution while catching more problems. It offers the advantage of making functional testing easier. It’s not a technique only for those on the bleeding edge. It’s here today, and it’s accessible to anyone doing test automation.
Next Steps
Overall, visual testing is a winning strategy. It has several advantages over traditional functional testing. Please note, however, that visual testing does not replace functional testing. Instead, it supercharges it. With a visual testing tool like Applitools Eyes, you can do visual testing in any major language or test framework you like, and with Applitools Ultrafast Test Cloud, you can do visual testing using any major browser or mobile configuration.
If you want to give visual testing a try with Applitools, start by registering a free account. Then, take of one of the Applitools tutorials. You can pick a tutorial for any of the supported SDKs. If you get stuck and need help, just contact me – I’ll be more than happy to help!
Source link