
Mopidy is an extensible music server written in Python. It provides a lot of different music sources, such as Spotify, SoundCloud, Google Play Music, and more. It’s a perfect open-source solution and alternative for SONOS, running on a Raspberry Pi.
It’s nearly perfect for kids, and the only thing missing is a kids-compatible interface. That’s where my new plugin Pummeluff comes in place.
The interface
If you remember your childhood, you might remember this gem:

Then you might also remember the good old times, when you were looking for a freakin’ pen, to rewind and screw the tape back into your cassette tapes. Apart from that, the walkman was pretty awesome! One reason why it was so awesome was its simplicity. The interface was well designed, straight-forward and just simple. There was no swipe-to-unlock, passcode prompt, bluetooth connectivity issues or alike. It was dead simple: Put a cassette tape into the magic box, press play and you’re good to go.
I’m sure, this was one of the keys for the success of the Walkman. And this is exactly what I’m trying to achieve with the on-going project. I’m trying to use cutting-edge technology, such as a Raspberry Pi, Debian Linux and the Mopidy server and connecting it with simplicity.
Instead of controlling Mopidy via web interface and all that fuzz, I was looking for a simpler solution. Something that even the little ones can control without being a master mind in technology (yet). That’s where I came up with RFID. An RFID interface can be something so simple, straight-forward and beautiful. It even supports the human nature of grabbing something and putting it on a specific spot.
Concept
Having thought about the so important interface, I already had a big part of my concept. And here’s the rest of it, or at least what I was trying to achieve:
- A small-ish all-in-one music box
- It must be portable and power-efficient
- It must play local songs from the SD card
- It must also support NAS systems and integrate Spotify
- It must support RFID tags and buttons as interface
- It should be developed in Python
- Last but not least, it must be KISS
Because my sister and some friends of mine recently got offspring, I thought this whole music-box-thingy would be a great gift. So the price tag of the whole package was crucial, thus I was looking for an affordable solution.
Hardware
It was time to get some hardware. Here’s what I’ve got:
- A Raspberry Pi 3 Model B (~ CHF/USD 40)
- A USB power bank with passthrough charging (~ CHF/USD 15)
- A pair of USB powered speakers (on AliExpress for ~ CHF/USD 3)
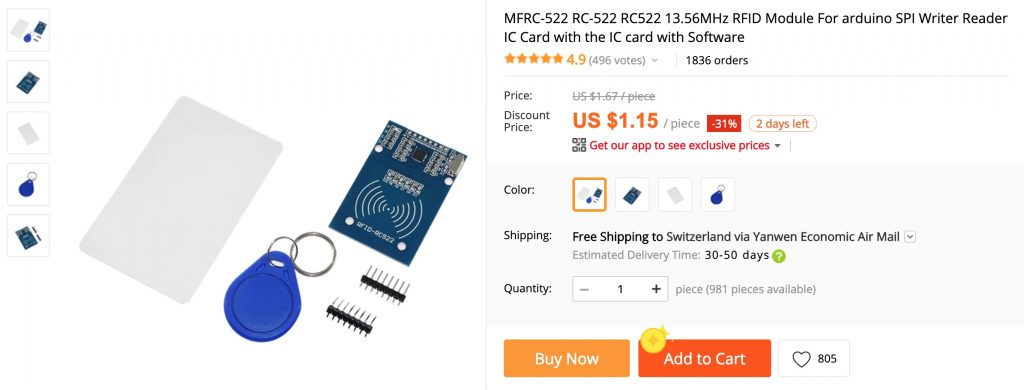
- An RC522 RFID module (on AliExpress for ~ CHF/USD 1)
- ISO 14443A tags (on AliExpress for ~ CHF/USD 0.4 per tag)
- Two push buttons (on AliExpress for ~ CHF/USD 1)
- Female jumper wires (on AliExpress for ~ CHF/USD 1)
As you can see, the most expensive parts are the Raspberry Pi and the power bank. So you end up with a package price of approximately CHF/USD 60, without the RFID tags. I’d call that affordable, and you can even get it cheaper if you’re looking for a used RPi and power bank.
The RC522 RFID reader is quite small and should work with Mifare & 14443A tags. There are also starter packages with included tags available:
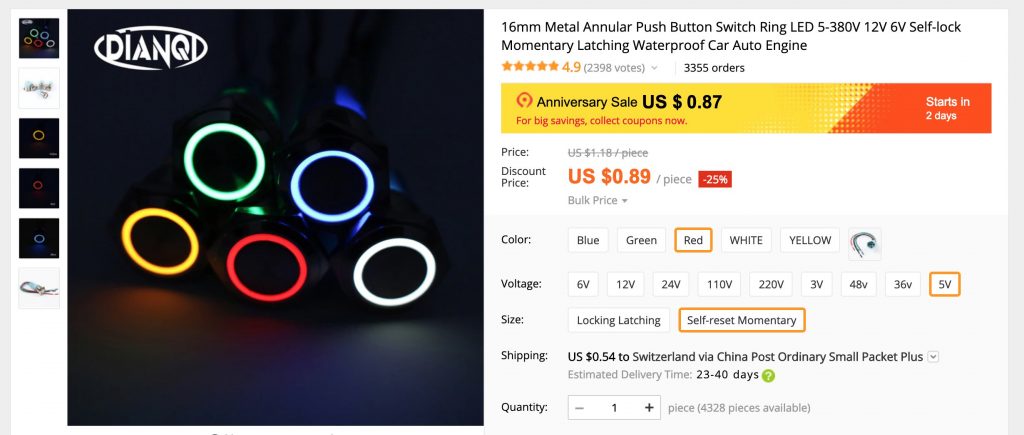
Mopidy / Pummeluff supports a status LED, which lights up when its ready. That becomes handy, especially when we shutdown or restart the RPi. I didn’t want to have a separate status LED, thus I decided to use buttons with integrated LED’s. There are plenty of them available and I used these 5V momentary push buttons:
I was going with the RPi 3B because there was one lying around at the office. However, a 3B+ should also work fine, as the GPIO pins are the same. Unfortunately, I don’t know about the RPi 1, 2 and Zero models, but you can give it a try.
Connecting the hardware
Now it’s time to connect the hardware. I’m a bit lazy, so I won’t describe here how you’ve to conenct the pieces. Just head over to the GitHub repo or PyPi repo and connect the components like described in the Connecting… chapters.
When everything is connected, continue to the next chapter.
Raspbian
First of all, we need to setup Raspbian on the microSD card of the RPi. I’m not going to explain how you can install Raspbian on your RPi, as there are already plenty of excellent tutorials out there. There’s also an official Raspberry Pi Installation Guide.
Boot your Raspbian and configure it by running the configuration utility:
sudo raspi-configConfigure the following options:
- 2 Networking Options
- N1 Hostname: Enter your desired hostname
- N2 Wi-fi: Enter your WLAN settings
- 4 Localisation Options
- Change the desired settings
- 5 Interfacing Options
- P4 SPI: Enable the SPI interface (important for the RFID module)
- 7 Advanced Options
- A3 Memory Split: Set the CPU memory to 8 MB
Now, your RPi should be connected to the WLAN. Get the IP address by running:
ip a s wlan0Let’s change the password of the pi user, enable SSH, upgrade the system and then reboot it:
# Change the password.
passwd

# Enable SSH after boot and start it.
sudo systemctl enable ssh
sudo systemctl start ssh

# Update system.
sudo apt update
sudo apt dist-upgrade

# Finally, reboot it.
reboot
Your RPi is now updated and should come back up. This means, we’re ready to go to install Mopidy.
Mopidy
The installation of Mopidy is quite simple. Just execute the following commands:
# Install Mopidy apt GPG key & repository.
wget -qO -  | apt-key add -
wget -qO /etc/apt/sources.list.d/mopidy.list

# Update sources.
apt update

# Install mopidy and pip.
apt install mopidy python-pip
This should be enough to install Mopidy. However, there are also some extensions you might be interested in.
HTTP server
Mopidy comes with an integrated web server called Mopidy-HTTP. By default, the web server is only listening on the local interfaces, so you want to add the following config to the Mopidy configuration:
# /etc/mopidy/mopidy.conf

[http]
hostname = 0.0.0.0
You should now be able to connect to Mopidy via IP}:6680/.
MPD server
Now, the web server itself has no web interfaces to control Mopidy. It’s just a simple web server. However, there are several web UI’s which can do exactly that. The most of them are based on MPD (Music Player Daemon). Fortunately, Mopidy also comes with an MPD server called, guess what, Mopidy-MPD. Unfortunately, it’s also listening only on localhost, so add the following bits to the Mopidy configuration as well:
# /etc/mopidy/mopidy.conf

[mpd]
hostname = 0.0.0.0
So, as we now have a HTTP & MPD server listening on all RPi interfaces, we can add an MPD web client to control Mopidy.
Iris
Iris (formerly known as Spotmop) is a really nice MPD web client, which is running directly on the integrated Mopidy HTTP server. You can install Iris via pip:
pip install mopidy-irisThat’s it! Iris, the awesome MPD web client is installed and is available via the Mopidy HTTP server.
Spotify
If you want to listen to Spotify songs, you also need to install the Spotify extension. To install it, we can use pip again, but we need to install some apt dependencies first:
apt install libspotify12 libspotify-dev libffi-dev
pip install mopidy-spotify
If you can’t find / install libspotify, make sure you’ve configured Mopidy’s own apt repo.
After you’ve installed the Spotify extension, you need to configure it according to the official github repo and/or the Mopidy website. The final configuration looks like this:
[spotify]
username = … your username …
password = … your secret …
client_id = … client_id value you got from mopidy.com …
client_secret = … client_secret value you got from mopidy.com …
Pummeluff
Developing Pummeluff
I was quite amazed by Mopidy and the existing extensions. Most of the features I was looking for were already available in beautifully crafted PyPi packages.
So the last missing bit was the communication with my hardware interface, known as RFID reader & push buttons. This is where I started developing Mopidy Pummeluff, as I couldn’t find anything usable on the internet.
Here’s what Pummeluff does:
- Adding a web UI which allows you to assign actions to RFID tags
- Reading RFID tags and executing the assigned actions
- Reacting to button pushes and executing the assigned actions
The following actions can be assigned to RFID tags:
- Replacing the tracklist with a new URI (e.g. Spotify track or playlist)
- Setting the volume to a new level
- Pause, resuming or stopping the playback
- Shutting down the system
Because I wanted the power bank to last for a very long time, I did two things:
- I’m using interrupts, which means we won’t have endless CPU cycles wasted just to read RFID tags or waiting for button pushes. Less CPU cycles equals less power equals more battery life.
- I’ve added a power button to shutdown the RPi into halt state and wake it up again.
Installing Pummeluff
First of all, we need to give our Mopidy user a little bit more permissions, so it can access the SPi interface and GPIO pins:
sudo usermod -a -G spi,gpio mopidyBecause I also want to shutdown the whole RPi with a push on a button, I had to create a sudo rule for that:
sudo echo "mopidy ALL = NOPASSWD: /sbin/shutdown" > /etc/sudoers.d/mopidyNow it’s time to install the Pummeluff extension:
sudo pip install spidev
sudo pip install mopidy-pummeluff
Last but not least, restart Mopidy:
sudo systemctl restart mopidyAnd we’re ready to go. Point a browser to the Mopidy Web UI, which by default is reachable like so:
_IP}:6680/
In the browser you should now be able to control Mopidy via the execellt Iris Web UI, and register new card via Pummeluff’s simple (and not very shiny) frontend.
Proof of Concept
To test when everything is connected together, I used an old wine box. And here’s how my PoC box looks like:
It doesn’t win a design award, and I could’ve given it a nice finish. But hey, it’s only a proof of concept and I’m minimalistic, so no bending over backwards here.
In the meantime, I’m already checking out (used) toys, which are large enough to fit everything into it. The RPi and power banks are probably the largest parts, but the RFID reader and buttons are quite small (and there are smaller counterparts available). The speakers aren’t very high-quality, but they deliver a decent sound for that price (it was approx. 3 USD). Thanks to their cheap casing, I can also take them apart and save a lot of space there as well.
Of course I’ll upload new photos as soon as I found a proper home for those electronics.
Verdict
I didn’t thought the project is going to be so straight-forward when I started it. However, by using a Raspberry Pi and the awesome Mopidy music server, I already had a solid base. With some additional hardware and a bit of programming, I achieved a really nice result. The Spotify integration is also a big plus, as Spotify has not only music, but also a lot of fairytales for the little ones. Of course you can also upload music directly to the SD card of the RPi or connect your NAS share to it.
As I love open source and the community behind it, I thought I’ll cover the whole idea in this blog post and publish my source on GitHub.
I hope somebody else can use this project for their kids, and I’m always happy to help. Feel free to contact me any time.
Source link